How to Use Our Free Printable Paper Ring Sizer
Our free printable ring sizer PDF gives you two reliable at-home measurement options on a single convenient sheet:
1. Cut-Out Paper Ring Sizer Strip
Cut along the outline of the printable paper strip and make a small slit at the marked slot. Wrap the pointed end around your finger, insert it through the slot with the numbers visible on the outside, and adjust until it forms a snug, comfortable loop at the base of your finger. The reading line directly indicates your estimated US ring size. Make sure the loop can still slide comfortably over your knuckle.
2. Printed Ring Measurement Circles
If you have a ring that already fits the intended finger, you can use the printed circle chart to match its size. Place your ring flat over the printed circles. Match the exact inside edge of your ring to the thin circle line so that no paper is visible between the inner band and the circle. If the ring falls between two circles, compare both neighboring sizes based on band thickness and fit preference.
How to Verify 100% Print Scale (50 mm Ruler & Bank Card Check)
For printable paper ring sizers to be accurate, the document must be printed at exactly 100% true physical scale. Default printer settings often distort dimensions to fit paper margins, leading to incorrect size estimates.
When opening your browser or PDF viewer’s print dialog, locate the page sizing options and select"Actual Size" or enter 100% in the custom scale box. Make sure options such as"Fit to Page", "Fit to Printable Area", or "Shrink Oversized Pages" are completely disabled. These options automatically shrink the page by 3% to 7%, making the printed circles and sizer strips significantly smaller than actual jewelry dimensions.
Before cutting out the strip or placing a ring on the circles, always verify the printed scale using the 50 mm scale check line at the top of the sheet. Measure the line from end to end using a physical ruler: it must measure exactly 50 millimeters (5.0 cm or 1.97 inches). You can also align a standard ID-1 bank card against the card outline to verify that the width matches 85.60 mm and height matches 53.98 mm. If the line does not match 50 mm, adjust your printer scale settings and reprint before measuring.
What is included in your ring sizer printout?
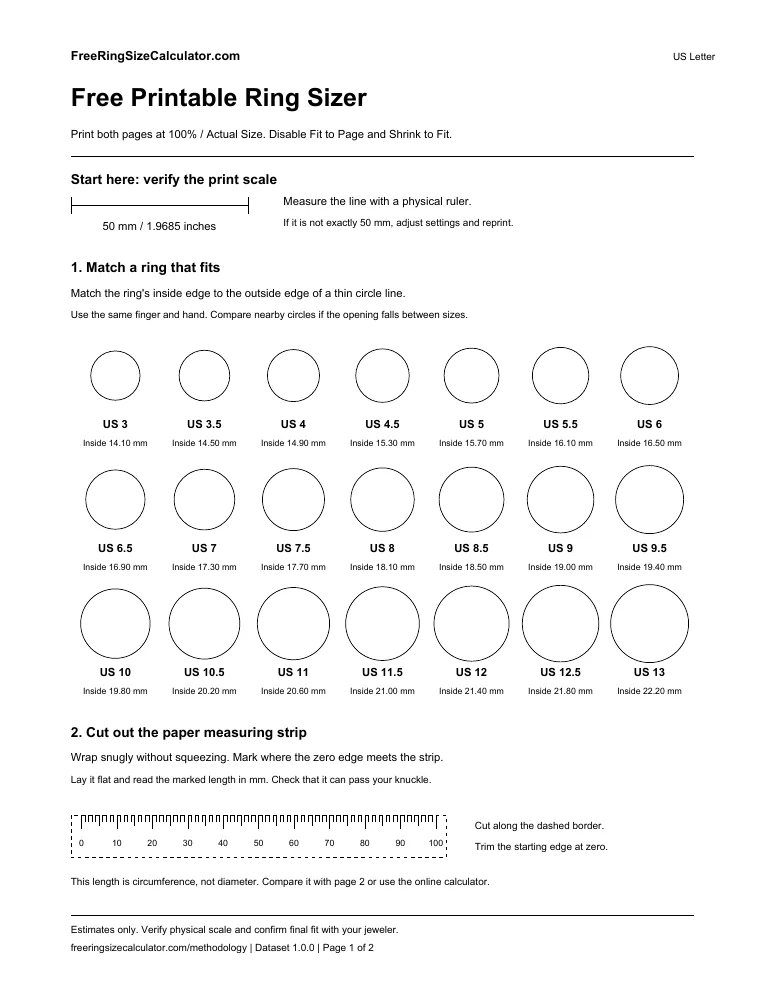
This free printable ring sizer has two pages. The first includes circles for US / Canada sizes 3–13 in half-size steps and a paper measuring strip. The second is a ring size chart with approximate UK / Australia, EU, India, and Japan equivalents. Both use the same sizing dataset as ourring size calculator, so the measurements agree across tools.
You will need plain paper, a printer, a ruler, and scissors if you plan to use the strip. A ring that already fits the intended finger is useful for the circle method. The small preview above shows the actual downloaded PDF; it is not a physical measurement reference on screen. Use the printed sheet after checking its scale.
How to print a ring sizer at the correct scale
- Download the A4 or US Letter PDF to match the paper in your printer.
- Open the PDF in a PDF viewer. Choose 100% or Actual size in its print dialog. Turn off “Fit to page” and “Shrink to fit.”
- You can also use “Print from browser” above. Choose your paper size, use 100% scale, and turn off browser headers and footers.
- Measure the scale-check line on the printed page. It must be exactly 50 mm before you use the circles or strip.
If the line is too long or short, check the paper size and scaling settings and print again. A printer or PDF viewer may resize a document even when the preview looks correct. Screen calibration does not set the size of a printout; the physical scale check is what matters here.
Measure a ring or your finger using the printed sizer
For an existing ring, place it flat over the circles. Match its inside edge to the outside edge of the thin circle line, then read the US size below. The outer edge of the ring includes the metal band and will give a larger measurement. Compare neighboring circles if the opening falls between two sizes.
For your finger, cut out the paper strip and wrap it snugly without squeezing. Mark where the starting edge overlaps, lay the strip flat, and read the marked length. This is circumference: the distance around your finger. Enter the length into thefinger circumference calculator, or compare it with the international ring size chart. Make sure the strip can pass over your knuckle.
Check the fit before ordering a ring
A ring sizer printout gives an estimate. Repeat the measurement at a comfortable room temperature, since finger size can change with temperature and activity. Paper can stretch, and pulling the strip tight can compress your finger. Band width, knuckle shape, and preferred fit also affect comfort; choosing a larger size is not the right answer for everyone.
Check the retailer’s sizing instructions before ordering. International conversions are approximate, and smart rings such as Oura use their own model-specific sizing kits. For an expensive or non-resizable ring, consider a professional fitting. Ourmeasurement methodology and accuracy guideexplains the chart references, rounding, and practical limitations.
Common printable ring measurement mistakes
A downloaded PDF does not prevent a printer from shrinking the page. Verify the reference line every time. Measure the opening of a ring, rather than including its metal band, and trim the PDF strip’s starting edge at the zero tick before wrapping it. Record the full length around your finger, not its width across the screen.
Need help with the two methods? Follow our illustratedguide to measuring ring size at home.
Printable ring sizer questions
Is this printable ring sizer PDF free?
Yes. Both paper formats are free to download and use, without an account or payment details.
Should I choose A4 or US Letter?
Choose the format that matches your printer paper. US Letter is 8.5 × 11 inches; A4 is 210 × 297 mm. The ring measurements are the same in both files.
Can I download the ring sizer on my phone?
Yes. Tap either PDF download button. Your browser may save the file or offer a PDF preview; use its Save or Share option if needed. Print the saved file at actual size.
What if the 50 mm line is the wrong length?
Do not use that printout to measure. Match the selected paper size to your paper, disable scaling to fit the page, and reprint at 100%. Check the line again with a ruler.